A Step by Step guide to find an anagram in Java

In this blog I am going to give you a detailed understanding of how to find if two strings are anagrams of each other. We will first understand what an anagram is, consider different types of input data and then finally move on to write the code in Java. Like always, we will approach this step by step. Along the way, I will deliberately make a few mistakes which will result in incorrect results for a few cases. We will then fix the code so that we get the appropriate results for all inputs. This way, you will understand the code a lot better.

What is an anagram ?

An anagram is a word or a phrase formed by rearranging the letters of another word or phrase. This is straight out of wiki. I think it is a good read if you are interested in the history of anagrams and the application of anagrams.

Let us break the definition down into 2 parts –

  1. ‘An anagram is a word or a phrase’ – The phrase part is important as most examples focus on just a single word.
  2. ‘formed by rearranging the letters of another word or phrase’ – This is straightforward to understand – the key here is rearrangement.
Examples of Anagrams
  1. evil” = “vile” – Of course they don’t mean the same ! These are anagrams since the frequency of each character is the same in both words. It is just rearranging the characters in the word ‘evil’, which gives us the word vile.
  2. “coronavirus” = “carnivorous” – same frequency of each character in the words coronavirus and carnivorous and just rearrangement of characters.
  3. “debit card” = “bad credit”. This is a different kind of an example – a phrase ! Note that this has a space in between, make a note of this. The characters in the phrase on the left side have same frequency of characters as on the right side.
  4. “William Shakespeare” = “I am a weakish speller”. A couple of different things to notice in this example – The name on the left side is in uppercase but the one on right side is in lowercase. Another observation is that the name has changed into a sentence. The frequency of the characters on the left side is still the same as on the right side, just rearrangement as usual.
Common observations

For 2 words or phrases to be anagrams –

  1. The 2 words/phrases must have same characters along with same frequency.
  2. They can have a space in between which we need to handle.
  3. Upper/Lower case of the words/phrases should be handled appropriately.
Time for some code

We need to check if 2 strings/phrases are anagrams. Hence, the input will be 2 strings. Let’s assume that they are not null. If they are anagrams, we return a true else return false. This can easily be translated into a function in Java which takes 2 parameters and returns a boolean value. Let’s call that function, isAnagram.

public static boolean isAnagram(String first, String second) {

    return true;
       
}

The function, isAnagram, takes 2 parameters and returns true for the moment.

Let’s consider our first example of “evil” and “vile”. These are anagrams. The characters have been rearranged. What if we were to arrange them in the same way ?

To arrange the characters in the same way, we need the characters from the string. A string is made up of characters. We can use the toCharArray function on a string to get each character.

char[] charactersOfFirst = first.toCharArray();
char[] charactersOfSecond = second.toCharArray();

We have our character array from each string. How do we arrange them in the same way ? Well, we can sort the characters in each array using the Arrays class.

Arrays.sort(charactersOfFirst);
Arrays.sort(charactersOfSecond);

What is left now is simply checking if the sorted characters are the same. How do we do that ? We can use the Arrays. equals method for this and pass the sorted character arrays to it.

return Arrays.equals(charactersOfFirst, charactersOfSecond);
Combining the code from last 3 steps
public static boolean isAnagram(String first, String second) {

        char[] charactersOfFirst = first.toCharArray();
        char[] charactersOfSecond = second.toCharArray();

        Arrays.sort(charactersOfFirst);
        Arrays.sort(charactersOfSecond);

        return Arrays.equals(charactersOfFirst, charactersOfSecond);
}

Well, that’s it ! Passing the inputs as “evil” and “vile” gives us true. Passing inputs as “coronavirus” and “carnivorous” also give us true.

Pictorial view of code execution when input is “evil” and “vile”
Does this code work for all cases ?

If we were to pass the inputs as “customers”and “store scum”, the function returns false. It should have returned true. The characters are the same along with the frequency. However, did you notice that there is a space in the second word , store scum?

Blank space as first character in ‘ cemorsstu’

Do you remember that this was one of the scenario we were going to handle ? Well, now is the right time to handle it ! This is simple – just replace the space between the words with an empty string. How do we do that in Java? Use the replaceAll method from String class.The replaceAll method takes 2 parameters, a regular expression in String format and the replacement String. The regular expression for space is: “\s” and we need to replace it with “”, an empty string. So with this understanding, our modified code will be –

public static boolean isAnagram(String first, String second) {

    char[] charactersOfFirst = first.replaceAll("\\s", "").toCharArray();
    char[] charactersOfSecond = second.replaceAll("\\s", "").toCharArray();

    Arrays.sort(charactersOfFirst);
    Arrays.sort(charactersOfSecond);

    return Arrays.equals(charactersOfFirst, charactersOfSecond);
}

You can see the highlighted code for the changes. The extra ‘\’ in “\\s” is to escape the ‘\’ in the string “\s”. With this change, we get the correct output of true when the input is “customers” and “store scum”. If we were to pass the input as “debit card” and “bad credit”, we get true.

Are we done now ? Well, not really. If we were to pass the input as “William Shakespeare” and “I am a weakish speller”, we get false, which is the incorrect answer. The frequency of the characters is the same in both strings, we handled the space as well.

Sorting is done based on ascii codes

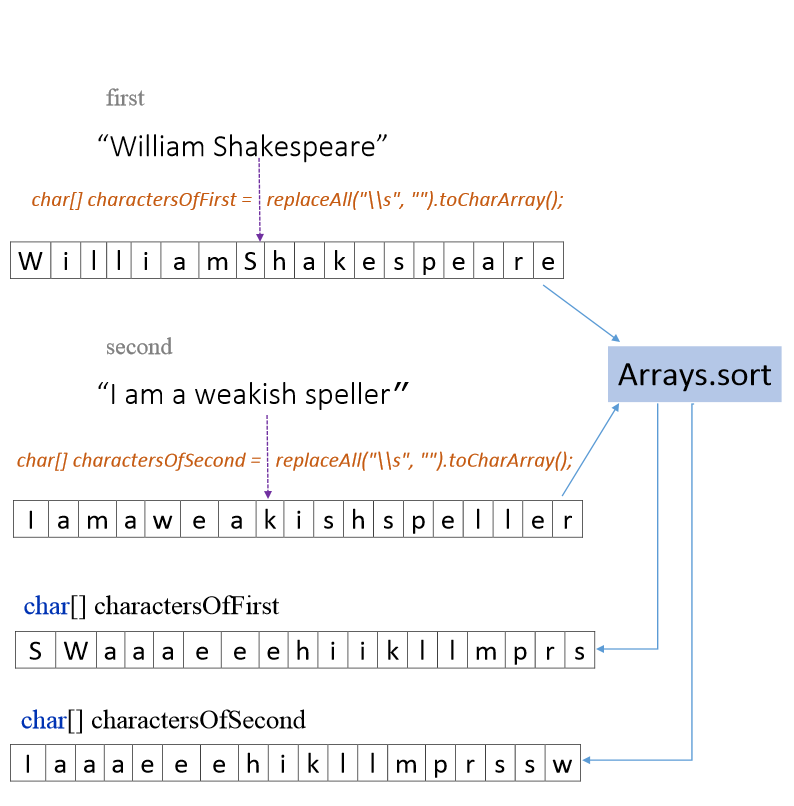
Why is it failing ? Did you notice that the characters ‘W’ and ‘S’ in the first input string are in capital letters but in the second string, they are in lower case. The character arrays are sorted based on the ascii codes for upper and lower case letters. Ascii code for upper case letters starting from ‘A’ begins from 65 and for ‘a’, it starts from 97. So sorting them with mixed case characters and then applying equals does not help. The Arrays.sort method sorts each character array in ascending format. So in each character array, you see upper case letters(lower ascii) first followed by lower case(higher ascii value). Let’s modify the code to handle this scenario.

public static boolean isAnagram(String first, String second) {

        char[] charactersOfFirst = first.replaceAll("\\s", "").toLowerCase().toCharArray();

        char[] charactersOfSecond = second.replaceAll("\\s", "").toLowerCase().toCharArray();
        
        Arrays.sort(charactersOfFirst);
        Arrays.sort(charactersOfSecond);

        return Arrays.equals(charactersOfFirst, charactersOfSecond);
}

As shown in the highlighted code above, we only add the call to the function toLowerCase(). We add this function call for both the inputs. By doing this, we treat characters in both inputs as lower case. Now, if were were to pass the input as “William Shakespeare” and “I am a weakish speller”, we get true, which is the correct input.

I know what you are thinking now. You must be saying , “Oh, please tell me that we are done now ! “. Well, just one more change and our code will be ready for all scenarios. In fact I would say the next change is more of an improvement.

Final changes to the code

We have handled spaces, case sensitivity and the contents of the string by converting it to a character array and then sorting it. But what if the input strings are of unequal length even after removing the spaces ? In this scenario, we don’t want to sort the array and compare them later. What we can do is simply check for the length of the 2 character arrays after we remove the spaces between the words.

public static boolean isAnagram(String first, String second) {

        char[] charactersOfFirst = first.replaceAll("\\s", "").toLowerCase().toCharArray();
        char[] charactersOfSecond = second.replaceAll("\\s", "").toLowerCase().toCharArray();

        if (charactersOfFirst.length != charactersOfSecond.length) {
            return false;
        }

        Arrays.sort(charactersOfFirst);
        Arrays.sort(charactersOfSecond);

        return Arrays.equals(charactersOfFirst, charactersOfSecond);
    }

It would be incorrect to check for length of the input strings as the first step in the function. If the input strings were “William Shakespeare” and “I am a weakish speller” and we were to check for the length of the string before converting it into a character array, the code would return false. The length of the string “William Shakespeare” is 19 and length of “I am a weakish speller” is 22. Even though they are valid anagrams, comparing input string lengths would not be right.

Conclusion

We have handled most of the scenarios and I think the code above is the final version. But it is the final version using this approach of sorting the character array and using the Arrays.equals method to check for contents. This is not just a valid solution but a good solution as well. I have not considered a scenario where the string contains special characters but this can be handled in the same way we handled the spaces.

The code above which uses sorting has time complexity of O(n log n). We can improve this code further by using a different technique where we can avoid the sorting. I will definitely write another blog on this soon. Until then, Happy Anagramming !

How to find permutations of a String using recursion in Java ?

In this blog we are going to find out all the permutations of a given string. Like always, we will first start from the basics – Understand what is a permutation of a string, break the procedure down into smaller steps and understand the procedure of finding out one permutation. Finally, we will write code in Java for the same. Along the way, I will also be explaining each line code and show you pictorial representations of the code execution so that you can visualize it better.

What is a permutation ?

Different ways of arranging a set of items is permutation. A string is a sequence of characters. Permutation of a string is arranging the characters of the string in different ways. Let’s take an example to understand this.

Permutation of a String

The string “ace” can be arranged as “ace”, “aec”, “cae”, “cea”, “eac”,”eca” – different arrangements of the characters a,c,e which make the string “ace”. Note that the string “ace” is of length 3 and we get 6 different permutations of the same – 3 factorial. If the input string was “aced”, we will get 24 permutations – 4 !

Observation about the permutations

Did you notice that the first 2 permutations “ace”, “aec” have a as the first letter and the 2 other letters are then concatenated to the letter a.

Extracting the first character ‘a’ from “ace” leaves us with the remaining characters “ce”. It can be rearranged as “ce” , “ec”. Finally appending each to “a” results in “ace” and “aec“.

If we single out the character ‘c’ in ace, we are left with “ae”. With “ae”, rearranging them gives us “ae” and “ea”. Appending this to ‘c’ results in “cae” and “cea“.

If we single out the character ‘e’ in ace, we are left with “ac”. With “ac”, rearranging them results in “ac” and “ca”. Appending this to ‘e’ results in “eac” and “eca“.

Translating these observations into a technical perspective

We are taking a single character from the given string, starting with ‘a’, moving on to ‘c’ and finally visiting ‘e’. This can be done using the charAt function. We also need a for loop as we need to single out each character from the string.

for(int i = 0; i < remainingString.length();i++) {
    char ch = remainingString.charAt(i);
    ...
}

For each character that we extract, we need the rest of the string. So when we extract ‘a’ from the “ace”, we need “ce” so that we can have different arrangements of “ce” to append it to ‘a’. When we extract ‘c’ from “ace”, we need “ae”. When we extract ‘e’ from “ace”, we need “ac”. In short, when we are at a particular iteration , i , in the for loop, we need a string from the characters before and after that character.

How do we extract the remaining characters ?

We make use of the substring function to do that. The variable ‘i’ in the for loop points to current single character that we extract. When we extract ‘c’ from “ace”, we need to get “ae”. We can get all characters before i by making a call to substring(0,i) and everything after i by calling substring(i+1). We append them to get the remaining string.

When i =1 and ‘c’ is extracted
for(int i = 0; i < remainingString.length();i++) {
    char ch = remainingString.charAt(i);
    String next = remainingString.substring(0,i)  + 
                  remainingString.substring(i+1);
    ...
}
Applying recursion

What is clear so far is that we start with the first character and apply permutation with remaining characters. Then we choose the second character and apply permutation with remaining characters. We continue this way until we visit each character in the string. To do something like this, recursion can be a good choice.

So let us take the code above and add it to a function, permutations.

public void permutations(String remainingString , String permutation) {
    for(int i = 0; i < remainingString.length();i++) {
        char ch = remainingString.charAt(i);
        String next = remainingString.substring(0,i)  + 
                      remainingString.substring(i+1);
        //Code here for recursive call to permutations
       }
}

This function takes 2 parameters – remainingString and permutation. Why do we need them ? Well, the parameter remainingString keeps track of length of string to produce one complete permutation of current string.The permutation parameter will keep track of the current permutation.The first time this code starts executing, the remainingString will be the input string, “ace”, and the permutation will be a blank string, “”, since we are yet to start finding permutations. Now we start with ‘a’,fix that and then extract “ce”. So ‘a’ will be stored in ch and “ce” will be stored in variable referred to as next.

What do we have so far ?

remainingString = “ace”, permutation = “”, ch = ‘a’, next = “ce”

What should the next step be?

The variable, permutation, so far is “”, it should be “a”. It is not a valid end permutation but an intermediate one. The current value is a “”. Appending “” to “a” gives us “a”. So let’s define a variable permute and assign it to permutation +ch.

            String permute = permutation+ch;

So the variable permute = “” + “a” = “a”

public void permutations(String remainingString , String permutation) {
    for(int i = 0; i < remainingString.length();i++) {
        char ch = remainingString.charAt(i);
        String permute = permutation+ch;
        String next = remainingString.substring(0,i)  + 
                      remainingString.substring(i+1);
        //Code here for recursive call to permutations
       }
}

Now, remainingString = “ace”, permutation = “”, ch = ‘a’, next = “ce”, permute =”a”

The next logical step is working on “ce” to extract ‘c’. Once that is done, the intermediate permutation is “ac”. “a” from the previous iteration and ‘c’ extract from current one. When we extract ‘c’ from “ce”, what remains is “e”. This is the same sequence as previous steps.

The solution seems to repeat for the next sub-problem. This can be solved by recursion. We need to call the permutations function. It takes 2 parameters – remainingString and permutation. The variable, next, has value “ce” and permutation currently is “a”. Let’s make a call to permutations function and pass these parameters.

public void permutations(String remainingString , String permutation) {
    for(int i = 0; i < remainingString.length();i++) {
        char ch = remainingString.charAt(i);
        String permute = permutation+ch;
        String next = remainingString.substring(0,i)  + 
                      remainingString.substring(i+1);
        //Code here for recursive call to permutations
        permutations(next,permute);
       }
}

After the first recursive call, remainingString = “ce”, permutation = “a”. When code above starts execution, i = 0 , ch = ‘c’ , permute = “a” + ‘c’ = “ac” , next = “e”. Note that when this call happens, i = 0 . This block will get executed twice as the for loop checks for length of remainingString. More on this later. Then there is a recursive call again to the function by passing “e”, “ac”.

In the next iteration, remainingString = “e”, permutation = “ac”. When the code starts executing, i = 0 , ch = ‘e’ , permute = “ace” , next = “”. Then there is a call to recursive function with “” and “ace”.

Now , remainingString = “” , permutation =”ace”. It looks like the remainingString is a blank string along with the fact that permutation is “ace”. We are in a recursive function, every recursive function should have some condition to return if it has processed it’s sub-problem. This part is now solved, isn’t it ? So we need a terminating condition – the length of the variable, remainingString, can be that condition. We simply check if it’s length is zero.

public void permutations(String remainingString , String permutation) {
    if(remainingString.length() == 0 ) {
        System.out.println(permutation);
        return ;
    }

    for(int i = 0; i < remainingString.length();i++) {
        char ch = remainingString.charAt(i);
        String permute = permutation+ch;
        String next = remainingString.substring(0,i)  + 
                      remainingString.substring(i+1);
        permutations(next,permute);
       }
   }

After the execution of this code we get “ace” and this function returns. The code execution continues from the the location that it was called – this is really the previous step. Take a look at the following flows to get a better understanding. Start from the block which says start and then the steps have been numbered.Push and pop indicates recursive function calls and returning back from a function.

Snapshot of the function calls when i = 0 and input is “ace”
Produces 2 permutations “ace” and “aec”

Step 1 will get executed twice as length of “ce” is 2. When i is 0, we get “ace” and when i =1 , we get “aec”. When the function returns from step 2, we go back to step 1 where i will become 1. This will cause step 4 to be executed.

Note that, all these steps are happening when input is “ace” and i = 0. When i =1, a similar set of steps will be executed producing 2 more permutations.

Snapshot of the function calls when i = 1 and input is “ace”
Produces 2 permutations “cae” and “cea”
Snapshot of the functional calls when i = 2 and input is “ace”
Produces 2 permutations “eac” and “eca”

The images below will give you a more detailed view of how the code and function calls execute. We call the function, permutations, pass the parameters “ace” and “”.

Snapshot of the code execution when input is “ace” and i=0
These steps produce 2 permutations – ace and aec as seen in steps 3 and 5
Snapshot of the code execution when input is “ace” and i=1
These steps produce 2 permutations – cae and cea as seen in steps 8 and 10

I have left out the code tracing when i=2, it can be a good exercise for you.

Conclusion

The number of lines of code that we had to write to produce the permutations is small but there is a lot that is happening behind the scenes.Such kind of problems are being asked in technical interviews. Irrespective of this, I think recursion is an important concept to understand and it is also a good fit for a good number of problems.

Recursion is not very straight forward to understand but I hope the pictorial representations and breaking up the code step by step have given you a good understanding of the same. I urge you to take a piece of paper and trace the execution for one particular iteration – this will not only solidify your understanding of the solution to the permutation problem but help you sharpen your skill set by understanding recursion.

How to find all duplicates in an array – Java and Kotlin

During a conversation with my colleague, he mentioned to me about a problem that he was asked in his technical interview. The problem was to find the duplicates in an array of integers. My immediate reaction – “That is easy and I am sure you got it !” But just then there was a two second silence from his end and then he said that he couldn’t get it right since some additional constraints were mentioned to him ‘later’.

Problem Statement

Find the elements which appear twice in an array of integers, where the elements in the array being : 1 ≤ a[i] ≤ n (n = size of array). We need to do this without using additional space in O(n) runtime.

Solution

Now, it was my turn to be silent for the next couple of seconds after he told me about the problem statement with the constraints about not using additional space and O(n) runtime.

We had a discussion about using a Set or may be a HashMap in Java since the main part of the problem was to find the “duplicates”. Using a Set or a Map would not be the right solution with these constraints. A nested for loop would also not be the right solution since we need to solve the problem in O(n) runtime. Well, let’s consider some sample data and try solving this step by step.

Sample Input data

The output for this input will be 10 and 1. They both appear twice. Note that the length of the array is 10 and the maximum value of any element in the array is <=10. This is an important constraint.

Let us solve this step by step
Elements of array, arr, where iteration starts at 0
  1. Loop through the array and for each iteration-
    1. Take the value at each index. Currently at 0, in the first iteration, the value will be 10
    2. Subtract one from this value. During iteration 0, the result will be 9. The reason we subtract one is because the value of any element in the array is <=n, where is n is size of the array. The array index starts from 0. So an array of size 10 can contain a maximum value of 10 but there is no arr[10].
    3. Use this result as an index. For iteration 0, this will be 9, go to element number 9 and negate the value at this index number 9
Why should we do this and what about the duplicates ?

Well, if we encounter another value of 10 in this array, the index obtained using steps above will result in 9 again. We access to value at 9th position which is -7 now. We check if this is less than 0 and if it is less than 0, it means we have already visited the ‘value at this current iteration‘. This means it is a duplicate value. So step 3 in the algorithm above can be modified as follows:

Loop through the array and for each element in the array, let’s refer to the array as arr, do the following –

  1. Take the value at each iteration. Currently at 0 in the first iteration, the value will be arr[0] which is 10.
  2. Subtract one from this, the value will be 9. Let us refer to this value as index.
  3. Using this index, access the value at this index, element at index 9, arr[9]. If the value at this index is less than 0, add arr[current_iteration] to the list of duplicate elements.
  4. Negate the value at this index.(currently 9 for this iteration 0)
  5. Go back to step 1, the next iteration which is current_iteration + 1.
Flowchart
Iteration 0
Iteration 1
Iteration 2
Iteration 3
Iteration 4

In this iteration number 4, when we access the value at arr[4], we get a -9. If we were to follow step 2 of the algorithm, we would land up with an index of -10 and then in step 3 we would access arr[-10] which is incorrect. So we need to modify the algorithm to take absolute value of the same.

Iteration 5
Iteration 6
Iteration 7
Iteration 8
Iteration 9 (Final iteration)
Java Code
import java.util.ArrayList;
import java.util.List;

public class DuplicatesInArray {

    public static List<Integer> findDuplicates(int arr[]) {
        List<Integer> duplicates = new ArrayList<>();
        for (int i = 0; i < arr.length; i++) {
            int index = Math.abs(arr[i]) - 1;
            if (arr[index] < 0){
                duplicates.add(Math.abs(arr[i]));
            }
            arr[index] = -arr[index];
        }
        return duplicates;
    }

    public static void main(String[] args) {
        int [] arr = {10,2,5,10,9,1,1,4,3,7};

        List<Integer> duplicates = findDuplicates(arr);
        System.out.println(duplicates);
    }
}

The Math.abs is required since we could have negated the value at an index in a previous iteration. If we don’t do a Math.abs, we will land up accessing arr[-index]. For the same reason, Math.abs is also required while adding an element to the list of duplicate values.

Kotlin code
fun findDuplicates(arr:IntArray) : List<Int>{

    var duplicates  = arrayListOf<Int>()
    for(itemIndex in arr.indices){

        val goToIndex = Math.abs(arr[itemIndex]) - 1

        if(arr[goToIndex] < 0 ){
            duplicates.add(Math.abs(arr[itemIndex]))
        }

        arr[goToIndex] = -arr[goToIndex]
    }
    return duplicates
}

fun main(){
    var arr = intArrayOf(10,2,5,10,9,1,1,4,3,7)
    println(findDuplicates(arr))
}
Conclusion

We have traversed the entire array and the list of duplicates has 2 elements: 10 and 1. The flip side of this algorithm is that the elements of the array are modified but we have not used any additional storage. We have also managed to do this in O(n) as this is just a single pass of entire array.

The code in Java and Kotlin is quite simple but you need to know the algorithm/solution for this particular problem before hand. This problem is an interesting one given the constraints of space and time but I don’t think the solution was so straight forward. In my opinion, I don’t think the outcome of a technical interview should be decide based on just this problem.

Decorator Pattern using Java 8

In this post we are going to look at a couple of examples which use the GoF Decorator pattern. We will then refactor this code to use some of the features introduced in Java 8 which give Java a taste of functional programming. After this refactoring, we will see if the refactored code showcasing the decorator pattern becomes concise and easy to understand or makes it more complicated.

The basic idea behind the decorator pattern is that it allows us to add behavior to an object without affecting or modifying the interface of the class. I would suggest you to read and get a basic idea about the Decorator pattern in case you are completely unaware of it.

I would be considering 2 existing posts showcasing the decorator pattern and then we would be refactoring the code using Java 8.

Typical Decorator – Example one

The first example that we are going to look at is a code sample that I saw from a site, codeofdoom.com, which unfortunately does not exist anymore(domain seems to have expired). That post referred to an example which was simple to read and showed how a typical decorator pattern is implemented. I thought I had understood the pattern but I was mistaken.

The requirement in that example

The requirement that I understood from the code – We need to format a particular text supplied as input. The formatting can be one of several options- we return the text as it is, format the text to upper case, replace a word in the text with another word , concatenation of text with another string or a permutation and combination of the options. I have stated the requirements upfront but usually as developers we are never aware of the requirements upfront and requirements always keep changing. It would not make sense to create separate classes for each permutation – combination. In such situations, the decorator pattern can be extremely useful.

The example mentioned has an interface Text and a basic implementation of the same which returns the text. There are 3 classes AllCaps, StringConcat and ReplaceThisWithThat which are decorators taking the input text and adding specific behavior to it. The advantage of using the decorator pattern here is that we can use and combine 1 or more decorators to achieve formatting of the input text dynamically rather than sub-classing and creating different combinations of the sub-classes.However the implementation of a typical decorator is not so straightforward to understand. I had to debug a little bit to get a good understanding of how the code really decorates the object.

So let’s define an interface Text with a method format as shown below –

public interface Text {
    public String format(String s);
}

The BaseText class simply returns the text as is –

public class BaseText implements Text{

    public String format(String s){
        return s;
    }
}

The TextDecorator class serves as base decorator class which other classes extend. This decorator class is like a core class which helps in combining different functionalities.

public abstract class TextDecorator implements Text {

    private Text text;

    public TextDecorator(Text text) {
        this.text = text;
    }

    public abstract String format(String s);
}

The AllCaps class takes the input and formats it to uppercase –

public class AllCaps extends TextDecorator{

    public AllCaps(Text text){
        super(text);
    }

    public String format(String s){
        return text.format(s).toUpperCase();
    }
}

The StringConcat class calls format and then concatenates the input string –

public class StringConcat extends TextDecorator{

    public StringConcat(Text text){
        super(text);
    }

    public String format(String s){
        return text.format(s).concat(s);
    }
}

And finally, the class which replaces text “this” with “that” –

public class ReplaceThisWithThat extends TextDecorator{

    public ReplaceThisWithThat(Text text){
        super(text);
    }

    public String format(String s){
        return text.format(s).replaceAll("this","that");
    }
}

Test class to run the decorators –

public class TextDecoratorRunner{

    public static void main(String args[]){

        Text baseText = new BaseText();
                
        Text t = new ReplaceThisWithThat(new StringConcat(new AllCaps(baseText)) );

        System.out.println(t.format("this is some random text"));
    }
}

Notice how the call is done. It is actually inside-out but the code is read from the outside-in.

A pixel is worth 1024 bits
Flow of the Decorator pattern

The left hand side shows the calls to the format method in each decorator class and the right hand side shows how the decorators hold references or how they are chained.

The final output from this is – THIS IS SOME RANDOM TEXTthat is some random text.

Refactoring the decorator pattern using Java 8

Well, now to the main task of re-implementing the same using functional style. The BaseText class shown above has a function, format, which simply takes a String and returns a String. This can be represented using functional interface, Function<String,String> – introduced in Java 8.

import java.util.function.Function;

public class BaseText implements Function<String,String>{

    public BaseText(){
    }

    @Override
    public String apply(String t) {
        return t;
    }
}

Now, each decorator class implements a simple functionality of formatting a string in different ways and can be combined as shown below in a single class using static methods.

public class TextDecorators
{

    public static String allCaps(String s){
        return s.toUpperCase();
    }

    public static String concat(String input) {
        return input.concat("this is some random text");
    }

    public static String thisWithWhat(String input) {
        return input.replaceAll("this", "that");
    }

}

This simply leads us to the following –

public class TextDecoratorRunner {

    public static void main(String[] args) {
        String finalString = new BaseText()
                .andThen(TextDecorators::allCaps)
                .andThen(TextDecorators::concat)
                .andThen(TextDecorators::thisWithWhat)
                .apply("this is some random text");

        System.out.println(finalString);
    }
}

The code above does function chaining and uses method reference. It takes the text and passes it through a chain of functions which act as decorators. Each function applies a decoration and passes the decorated string as output to the next function which treats it as an input.  In this scenario, there is no need to have separate classes which act as decorators or the abstract base class. This implementation offers the same flexibility as the typical solution but I think it is also much much easier to understand as compared to the typical way of implementing the decorator pattern. There is also no inside-out or outside-in business when we call the function.

Typical Decorator – Example two

The second example that we are going to consider is shown here groovy decorator.  I would suggest you to read it to get a basic understanding of the use case. Also note the confusion between whether the complete text is logged in upper case or timestamp is logged in lower case.

Decorator pattern refactored

Let us try and use the same concept of function chaining to refactor this.

The code for the Logger interface would look like this –

public interface Logger {
	public void log(String message);
}

The SimpleLogger class –

public class SimpleLogger implements Logger {

	@Override
	public void log(String message) {
		System.out.println(message);

	}
}

The individual decorated logger can be represented as below –

import java.util.Calendar;

public class Loggers {
	
	public static String withTimeStamp(String message){
		
		Calendar now = Calendar.getInstance(); 
		return now.getTime() + ": "+  message;
	}
	
	public static String uppperCase(String message){
		
		return message.toUpperCase();
	}
}

And finally using function chaining –

import java.util.function.Function;
import java.util.stream.Stream;

public class LoggerTest {
	public static void main(String[] args) {

Logger logger = new SimpleLogger();

        Function<String,String> decorators = Stream.<Function<String,String>>of(Loggers::withTimeStamp,Loggers::uppperCase)
                .reduce(Function.identity(),Function::andThen);

        logger.log(decorators.apply("G'day Mate"));

	}
}

The code above looks a little daunting at first glance but it is actually simple, let us break it down –

Lines 9- 12 are the key to understanding this. I am using Stream.of and passing method references which are individual decorators.

  1. To combine them or to chain them, we use the Stream.of. The Function<String,String> in Stream.<Function<String,String>>of  is more of a compilation thing , to represent the Stream that the output is a Function<String,String>.  Using the Stream.of, we are forming a chain of functions.
  2. Now to the reduce part, the reduce part chains all of them together to form a single function. What do we want to do with each function as they come out from the stream ? We want to combine them, this is done using the andThen, that is exactly done in the 2nd parameter to the reduce function.  The first parameter to the reduce method is an initial value, this is the identity function – given a function, just return the function. Every reduction needs a starting point. In this case, the starting point is the function itself.
  3. The chaining yields a Function<String,String> decorators.
  4. We just call the apply method to this using the parameter G’day Mate which passes it through the chain of functions( decorators) and finally sends that to the logger.log method.

This version of the decorator pattern is easier to understand, we simply took a message, added the timestamp to it , converted it to upper case and logged it.The Stream.of and the methods references being passed to it might seem difficult at the first read, but trust me it is more of a new way of solving the problem and an easier one in my opinion.

Conclusion

We took 2 examples of the decorator pattern but both examples have clarified that there is certainly an easier and better way to implement the decorator pattern. In both cases the decorator pattern using the functional style is definitely more concise and easier to understand. Code that is easier to understand is always easy to maintain. Can we safely conclude that we probably don’t need the typical decorator pattern anymore?

Well, in the examples that we considered, we had just one method or one functionality to decorate, the format method in the first example and log method in the second example. In these scenarios, the functional style definitely seems better and there is no need to go about creating different classes, the abstract class and then use the cryptic way of calling them. But what if we had more than a single method to decorate ? This is something that needs to be looked at and I will try and answer that in another post.

Understanding @SpringBootApplication

The objective of this post is to get an understanding of what @SpringBootApplication annotation does in a Spring Boot application. Sometimes we just tend to add an annotation, everything works magically and we are happy.

But when we want to make a few changes, things start breaking, components are not found and then we blame the magic that we enjoyed earlier.So it is always a good idea to get a better understanding of what some of these annotations do.

In a Spring Boot application, we need a class with a main method annotated with @SpringBootApplication annotation as shown below:

package com.boot.jpa;

import org.springframework.boot.SpringApplication;
import org.springframework.boot.autoconfigure.SpringBootApplication;

@SpringBootApplication
public class SpringBootJpaApplication {

	public static void main(String[] args) {
		SpringApplication.run(SpringBootJpaApplication.class, args);
	}

}

This is the starting point for a Spring Boot application. The @SpringBootApplication annotation is really a short hand annotation or a combination of the following annotations:

1. @SpringBootConfiguration

This signifies that the application is not just a normal Spring application but a Spring Boot application. Actually this is just a combination of @Configuration+ Spring Boot, so more of a specialization. @Configuration applied on a file signifies that the class contains spring bean configurations using @Bean.

2. @EnableAutoConfiguration

This is the super intelligent annotation which kicks in the auto configuration for Spring Boot. Auto configuration is done by inspecting the classpath and configuring necessary beans that may be required. If you were to provide your own configuration, then Spring Boot will not re-configure the bean again.

How is this auto configuration done ?

Auto Configuration is done via a SpringFactoriesLoader class which will pick up and read the META-INF/spring.factories file.  It is like a hook into instantiating certain beans found on the classpath. A sample of the same is shown below. EnableAutoConfiguration class is the ‘key’ below and it can have many ‘values’ as classes. These are read and conditionally configured depending on what is already configured by the developer and what is found on the classpath. For example, only if RabbitMQ and Spring AMQP client are found on the classpath usually added via maven or gradle, then Spring Boot tries to configure RabbitMQ.

# Auto Configure
org.springframework.boot.autoconfigure.EnableAutoConfiguration=\
org.springframework.boot.autoconfigure.amqp.RabbitAutoConfiguration,\
org.springframework.boot.autoconfigure.data.jpa.JpaRepositoriesAutoConfiguration,\
....

3. @ComponentScan

Any Spring application will usually consist of beans which will be managed by Spring framework. To tell Spring framework to manage a bean, we use @ComponentScan. This annotation will scan all your beans and register it with the Spring Application Context. Later, you could inject the beans using @Autowired. Examples of a Component are classes annotated with @Controller, @Repository, @Service etc.

One has to be careful as @ComponentScan will scan the packages below the package from where this is defined.

A better way to organize your packages would be to have the  class containing the @SpringBootApplication in the root package of your application so that all sub packages get scanned and beans are registered with application context. If this is not possible for some reason, you can of course add @ComponentScan annotation and specify the base package(s) to scan for spring beans.

Conclusion

Annotations in the Spring or Spring Boot framework makes the life of a developer easy and increases productivity.However it is important to understand the ‘what and how’ of these annotations to be a more effective and efficient developer.

Java AutoCloseable : How does it work?

Most of us know that AutoCloseable is an interface that a class needs to implement to ensure that resources are automatically released. Let us consider a very simple example:

public class MyResource implements AutoCloseable{
    
	public void openConnection(){
		System.out.println("Opening expensive resource...");
	}
	
	public static void main(String args[]) throws Exception{
		
		MyResource myResource = new MyResource();
		myResource.openConnection();
	}

	@Override
	public void close() throws Exception {
		System.out.println("Releasing expensive resource...");		
	}
}

The output from this is simply :

Opening expensive resource…

The close method was never called.

AutoCloseable – Automatic Resource Management ?

We kind of assumed that implementing the AutoCloseable interface will magically do everything for us. Isn’t this feature also called Automatic Resource Management ? I think the automatic word can be a little misleading here.May be that is why this feature is also called try-with-resources. Well, as a programmer, I do forget things.

What we have clearly forgotten is to wrap the resource in a try block. If you read the java docs (which can be a bit boring at times), it is clearly mentioned that the resource needs to be wrapped in a try block. But I am sure we don’t really read the java docs that carefully. Most IDE’s now days show us a warning that the resource is never closed. Having said that, let us take a look at the byte code

public static void main(java.lang.String[]) throws java.lang.Exception;
Code:
0: new #5 // class blog/MyResource
3: dup
4: invokespecial #6 // Method “<init>”:()V
7: astore_1
8: aload_1
9: invokevirtual #7 // Method openConnection:()V
12: return

On line 9 , there is a  invokeVirtual call to openConnection method and really nothing about the call to close method. There is a return after a call to the openConnection method.

Try block to the rescue

Let us go ahead and wrap the resource in a try block.

public class MyResource implements AutoCloseable{
    
	public void openConnection(){
		System.out.println("Opening expensive resource...");
	}
	
	public static void main(String args[]) throws Exception{
	
		try(MyResource myResource = new MyResource()){
			myResource.openConnection();	
		}
	}

	@Override
	public void close() throws Exception {
		System.out.println("Releasing expensive resource...");		
	}
}

This time the output is as expected:

Opening expensive resource…
Releasing expensive resource…

So putting a try around the resource did invoke the close method. But to understand this, let us take a look at the byte code:

public static void main(java.lang.String[]) throws java.lang.Exception;
Code:
0: new #5 // class blog/MyResource
3: dup
4: invokespecial #6 // Method “<init>”:()V
7: astore_1
8: aconst_null
9: astore_2
10: aload_1
11: invokevirtual #7 // Method openConnection:()V
14: aload_1
15: ifnull 85
18: aload_2
19: ifnull 38
22: aload_1
23: invokevirtual #8 // Method close:()V
26: goto 85
29: astore_3
30: aload_2
31: aload_3

See line number 23 above. The compiler inserts the call to the close method after the openConnection method. This is done using invokeVirtual instruction.

Conclusion

If you implement the AutoCloseable interface and have an expensive resource which should be closed, remember to wrap the resource in a try block.

Testing JPA entities using Spring Boot 2, JUnit 5 and Java 14

In this article we will be looking at how to get started with testing JPA entities and the repository layer using Spring Boot 2.2 , JUnit 5 and Java 14. I have written a similar post here which uses Spring 1.5, JUnit 4 and Java 8. As the changes are significant I decided to keep them separate instead of updating that post.

I will be focusing mostly about the changes I had to make to the code to upgrade the libraries mentioned above. You can find the complete source code on github here.

Let us consider the same example of One-Many relation between SocialMediaSite and a User.

The @DataJpaTest

This remains the key ingredient behind running the JPA related tests in Spring Boot. @DataJpaTest disables full auto configuration and applies configuration related to JPA tests only. This concept hasn’t changed between Spring Boot 1.5 and 2.x. Now, let’s take a look at the areas where the code needed modifications.

Changes to the pom.xml

Upgrading the spring boot version to 2.2.6

<parent>
		<groupId>org.springframework.boot</groupId>
		<artifactId>spring-boot-starter-parent</artifactId>
		<version>2.2.6.RELEASE</version>
		<relativePath /> <!-- lookup parent from repository -->
</parent>

Upgrading java version to 14

<properties>
		<project.build.sourceEncoding>UTF-8</project.build.sourceEncoding>
		<project.reporting.outputEncoding>UTF-8</project.reporting.outputEncoding>
		<java.version>14</java.version>
	</properties>

Upgrading the dependency section to exclude JUnit 4

The spring-boot-starter-test dependency includes the vintage JUnit 4 and JUnit 5 dependencies.Since we will be using JUnit 5, we will exclude the vintage one.

<dependency>
			<groupId>org.springframework.boot</groupId>
			<artifactId>spring-boot-starter-test</artifactId>
			<scope>test</scope>
			<exclusions>
				<exclusion>
					<groupId>org.junit.vintage</groupId>
					<artifactId>junit-vintage-engine</artifactId>
				</exclusion>
			</exclusions>
		</dependency>

Junit 5 consists of 3 different sub projects – The JUnit engine , JUnit vintage ( Junit 3 and 4) and JUnit Jupiter( JUnit5). All JUnit 5 annotations reside in org.junit.jupiter.api package.

Support for preview features in Java 14

<plugin>
	<artifactId>maven-compiler-plugin</artifactId>
	<configuration>
		<release>14</release>
		<compilerArgs>
		    <arg>--enable-preview</arg>
		 </compilerArgs>
					 
                <forceJavacCompilerUse>true</forceJavacCompilerUse>
		  <parameters>true</parameters>
	</configuration>
</plugin>

<plugin>
	<artifactId>maven-surefire-plugin</artifactId>
	<configuration>
		<argLine>--enable-preview</argLine>
	</configuration>
</plugin>
Use of the Record type

Record type has been added as a preview feature in Java 14. The EmailAddress class has now been modified as a Record type. This was a value object before.

public record EmailAddress(String emailAddress) {

	public static final Pattern VALID_EMAIL_ADDRESS_REGEX = Pattern.compile("^[A-Z0-9._%+-]+@[A-Z0-9.-]+\\.[A-Z]{2,6}$",
			Pattern.CASE_INSENSITIVE);

	public EmailAddress {
		Assert.isTrue(isValid(emailAddress), "Email Address is Invalid !");
	}

	private static boolean isValid(String emailAddress) {
		return emailAddress != null ? VALID_EMAIL_ADDRESS_REGEX.matcher(emailAddress).matches() : false;
	}

}
Changes to the Test classes
  1. There is no need to add the @RunWith(SpringRunner.class) annotation anymore.
  2. The @Before annotation has been now replaced with @BeforeEach to perform any kind of setup before each test. Similarly the @After has been replaced with @AfterEach.
  3. The @Rule and @ExpectedException had been removed from JUnit5. The test classes have been refactored to reflect the same. The assertThrows and assertEquals method from the JUnit5 library have been used instead.
@Test
public void testShouldReturnExceptionForInvalidEmailAddress() {
		
	var exception = assertThrows(IllegalArgumentException.class, () -> new EmailAddress("test@.com"));
	assertEquals(exception.getMessage(), "Email Address is Invalid !");
}

The assertThrows method takes a functional interface, Executable as second parameter. We pass the block of code that needs to be executed to Executable.

Conclusion

The @DataJpaTest helps us to test the JPA entities and the repository layer. This is also called as test slicing as we are testing only the JPA components.The @DataJpaTest annotation contains @ExtendWith(SpringExtension.class) which integrates the Spring Testing framework with JUnit 5 model.

We have not explored many features of JUnit5 in this example but the combination of Spring Boot’s testing features and JUnit5 does make a powerful combination.

Switch on enums in Java 14

In this article we will be taking a look at switch statements and expressions on enums. If you are new to the switch expressions which was introduced in Java 14, take a look at my previous blog here.

Let us consider an Ecommerce application which maintains the status of an order. Let’s keep this simple and consider that the order can be in one of the following states – Placed,Confirmed,Cancelled,Delivered. This can be represented by using an enum as shown below:

public enum OrderStatus {
    PLACED,
    CONFIRMED,
    CANCELLED,
    DELIVERED
}

An order class contains this OrderStatus as shown below:

public class Order {
    private OrderStatus orderStatus;

    public void setOrderStatus(OrderStatus orderStatus) {
        this.orderStatus = orderStatus;
    }

    public OrderStatus getOrderStatus() {
        return orderStatus;
    }
}
Switch statement and enum

Consider a processOrder method which makes use of a switch statement as shown below:

private void processOrder(OrderStatus orderStatus) {
        String status = "";
        switch (orderStatus) {
            case PLACED, CONFIRMED, DELIVERED:
                status = "Success";
                break;
            case CANCELLED:
                status = "Fail";
                break;
        }
        //Further processing with status.
}

This code will compile without any problem. There is however one problem with this code. If we were to add a new state, (let us call it RETURNED) to the OrderStatus enum but forget to handle this in all switch cases,the code will silently fail as this case is not handled. The usual practice is to add a default case above so that the code does not silently fail without any indication.With a default case, the code can be modified to throw an error indicating to us that there is a change in the enum which we need to take care of.

   private void processOrder(OrderStatus orderStatus) {
        String status = "";
        switch (orderStatus) {
            case PLACED, CONFIRMED, DELIVERED:
                status = "Success";
                break;
            case CANCELLED:
                status = "Fail";
                break;
            default:
                throw new IllegalArgumentException("Invalid order status : " + orderStatus);
        }
        //Further processing with status.
    }
Switch expressions and enum

If we refactor the processOrder method using switch expressions,the code would look like this:

private void processOrder(OrderStatus orderStatus) {
        String status = switch (orderStatus) {
            case PLACED, CONFIRMED, DELIVERED -> "Success";
            case CANCELLED -> "Fail";
        };
        //Further processing with status.
}

If we were to introduce a new status RETURNED in the OrderStatus enum, the compiler immediately flags an error that the switch expression does not cover all the possible input values. We don’t need to write a default case that throws an Exception to handle this scenario.

private void processOrder(OrderStatus orderStatus) {
        String status = switch (orderStatus) {
            case PLACED, CONFIRMED, DELIVERED -> "Success";
            case CANCELLED -> "Fail";
        };
        //Further processing with status.
}

So in case of switch expressions on enums, the case blocks must cover all possible values.

Switch expression and default block

In case of switch expressions on an enum, the compiler inserts a implicit default block if the code does not already have one.This is extremely useful since it would indicate a change in the enum defintion. The default block is inserted as shown below: ( snippet from the .class file)

private void processOrder(OrderStatus orderStatus) {
        String var1;
        switch(orderStatus) {
        case PLACED:
        case CONFIRMED:
        case DELIVERED:
            var1 = "Success";
            break;
        case CANCELLED:
        case RETURNED:
            var1 = "Fail";
            break;
        default:
            throw new IncompatibleClassChangeError();
        }
    }

The default case is inserted if we don’t write one.

Conclusion

With the introduction of switch expressions in Java 14, code using enums in switch expressions is more robust. The compiler checks if all possible values have been handled and then inserts an implicit default case in case we don’t write one .

If the code containing the switch is not compiled and the enum is changed, the IncompatibleClassChangeError will signal an error. This feature will definitely avoid the silent failures that we have seen in switch statement using enums.

Switch expressions in Java 14

In this article we will be taking a look at switch expressions that have been incorporated in JDK 14 which was released on 17th March 2020.Switch expressions were made available as a preview language feature in JDK 12 and 13. Based on the feedback, changes were made and now this feature has been finalized in JDK 14.Let us start with a simple example of a switch block:

public int getNumberOfRooms(int budget) {
        int numberOfRooms = 0;
        switch (budget) {
            case 1000000:
                numberOfRooms = 1;
                break;
            case 2000000:
            case 3000000:
                numberOfRooms = 2;
                break;
            case 4000000:
            case 5000000:
                numberOfRooms = 3;
                break;
            default:
                System.out.println("Hello");
        }
        return numberOfRooms;
}
Vintage switch

The method above takes in a budget as parameter and depending on the budget it returns the number of rooms that one can buy with the budget. For simplicity, let us assume that we have a flat budget. 1 million can get us a single room. 2 and 3 million can get us 2 rooms and finally 4 and 5 million can get us 3 rooms.

Some observations about the usage of switch statement in the example above:

  1. Most usage of switch statements do some processing and return a value.
  2. Most case blocks have a break statement to avoid fall through otherwise it will execute the next case block till it encounters a break – it is quite easy to forget a break and well, adding a break serves the purpose but can make the code difficult to read at times. As experienced Java programmers, we are now used to it.
  3. The default case is optional and it does not enforce the programmer to throw an exception or return a value. I could add a System.out.println there and the code will compile and run.
  4. Multiple cases which require common logic to be processed have separate case labels on different lines with no break in between them which takes an effort to read and understand – Again we are used to it but imagine folks being introduced to the language for the first time.
The new modern switch
public int getNumberOfRooms(int budget) {

        int numberOfRooms = switch (budget) {
            case 1000000 -> 1;
            case 2000000, 3000000 -> 2;
            case 4000000, 5000000 -> 3;
            default -> throw new IllegalStateException("No rooms available for this budget");
        };
        return numberOfRooms;
}

  1. The new switch assigns/returns a value to a variable on the left side, hence called switch expression. Notice the semicolon on line 8 at the end of the switch block.
  2. Multiple cases are combined on the same line with a comma.
  3. The right hand side is separated with arrow (->) instead of a colon.
  4. No break in between cases, there is no fall through by default.
  5. The default case has to either return a value or throw an exception.
  6. Last but not the least and in fact an important difference is that this code is definitely more pleasing to the the eye and easier to understand.
Yield and scope in the modern switch

Let us introduce a small change in the business requirement. If we have a budget of 3 million or 5 million we need to give the customer a discount.Doing this using the vintage switch would lead to the following code:

public int getNumberOfRooms(int budget) {
        int numberOfRooms = 0;
        switch (budget) {
            case 1000000:
                numberOfRooms = 1;
                break;
            case 2000000:
            case 3000000:
                int finalPrice = (budget == 3000000) ? budget - 100000 : budget;
                System.out.println("Final price after discount " + finalPrice);
                numberOfRooms = 2;
                break;
            case 4000000:
            case 5000000:
                int finalPriceThreeRooms = (budget == 5000000) ? budget - 100000 : budget;
                System.out.println("Final price after discount " + finalPriceThreeRooms);
                numberOfRooms = 3;
                break;
            default:
                throw new IllegalStateException("No rooms available for this budget");
        }
        return numberOfRooms;
}

If you see line number 9 and line number 15 , we introduced 2 variables which does the same thing but we had to give it different names. This is because any variable introduced in case block stretches for the entire switch block.

Let us implement this using modern switch construct

public int getNumberOfRooms(int budget) {
        int numberOfRooms = switch (budget) {
            case 1000000 -> 1;
            case 2000000, 3000000 -> {
                int finalPrice = (budget == 3000000) ? budget - 100000 : budget);
                System.out.println("Final price after discount " + finalPrice);

                yield 2;
            }
            case 4000000, 5000000 -> {
                int finalPrice = (budget == 5000000) ? budget - 100000 : budget;
                System.out.println("Final price after discount " + finalPrice);

                yield 3;
            }
            default -> throw new IllegalStateException("Unexpected value: " + budget);
        };
        return numberOfRooms;
}

Using the modern switch, if a case block has multiple lines, we make use of a yield statement which indicates that the case block yields a value. Besides this, another salient feature is that the finalPrice variable introduced inside the case block remains local to that block which makes reading and understanding code easier. I have seen lots of code where variables are named using weird combinations like temp1, temp2, temp3 or finalPrice1,finalPrice2,finalPrice3 …This change does not enforce you to give meaningful names to variables but signals a clear intention about the scope of a variable in the case block.

More on the yield statement

The yield statement was introduced after seeking feedback. In JDK 12, break statement was used in switch expression which was confusing. It was hence decided to introduce the yield statement in switch expressions. I have been calling the switch in versions of JDK prior to 12 as vintage but they continue to exist along with the modern switch.

Some nuances with mixing and matching
  • We cannot use the arrow and the colon in the same switch block. We get a compile time error “Different case kinds used in switch”
public int getNumberOfRooms(int budget) {
int numberOfRooms = 0 ;
switch (budget) {
case 1000000 : numberOfRooms = 1;
case 2000000,3000000 -> {
  …
}
case 4000000, 5000000 -> { 
  …
}
default -> throw new IllegalStateException("Unexpected value: " + budget);
};
return numberOfRooms;
}
  • In case of the switch statement, we can use the new case label using the arrow. Doing this means there is no fall through and multiple cases can be combined using comma. You can add a break statement( no compiler error) but the arrow case label means there is no fall through
public int getNumberOfRooms(int budget) {
        int numberOfRooms;
        switch (budget) {
            case 1000000 -> {
                numberOfRooms = 1;
            }
            case 2000000, 3000000 -> {
                int finalPrice = (budget == 3000000) ? budget - 100000 : budget;
                System.out.println("Final price after discount " + finalPrice);
                numberOfRooms = 2;
                //redundant because of arrow.
                break;
            }
            case 4000000, 5000000 -> {
                int finalPrice = (budget == 5000000) ? budget - 100000 : budget;
                System.out.println("Final price after discount " + finalPrice);
                numberOfRooms = 3;
            }
            default -> throw new IllegalStateException("Unexpected value: " + budget);
        }
        return numberOfRooms;
    }
  • In case of a switch expression, we can use the old vintage style of using a colon for the case blocks. But since this is an expression, each case block must return a value using yield.
public int getNumberOfRooms(int budget) {
        int numberOfRooms = switch (budget) {
            case 1000000: {
                yield 1;
            }
            case 2000000, 3000000: {
                int finalPrice = (budget == 3000000) ? budget - 100000 : budget;
                System.out.println("Final price after discount " + finalPrice);
                yield 2;
            }
            case 4000000, 5000000: {
                int finalPrice = (budget == 5000000) ? budget - 100000 : budget;
                System.out.println("Final price after discount " + finalPrice);
                yield 3;
            }
            default:
                throw new IllegalStateException("Unexpected value: " + budget);
        };
        return numberOfRooms;
    }

Conclusion

The new switch expression feature will make our code more readable, intuitive and less error prone. This feature acts as a foundation for more changes to come in the Java language, one of them is pattern matching.

References

https://openjdk.java.net/jeps/361

Java 8 default methods – Basic introduction

Let us assume that you have designed, published a library and you have many clients who use your library. You have followed the “Object Oriented” concepts and hence made use of interfaces, abstract classes, util classes to design your library.

After a few years, you realize that the core library is quite old, they need to move ahead with time and hence you would like to add new features to this library. At the same time you do not want your existing clients knocking at your door at 2:00 am in the morning to complain about a new piece of functionality you added which broke their existing code.

What are the possible solutions to this?

  1. Have a new interface define these methods, introduce an abstract class  to implement the interface and provide some skeletal behavior for the new functionality. This is actually a design technique that has been used in the Collection framework – The problem here is that we have abstract classes which mean that the existing client cannot extend from more than 1 class. 
  2. Classes with static methods – The problem here is that the clients cannot override the functionality if they would like to. This means clients will have to use the single implementation which does not really give them flexibility.

So how do we achieve all of the following?

  1. Add new functionality to an old library.
  2. Not break existing client code.
  3. Allow clients to inherit behavior and not state
  4. Allow clients to override behavior if needed

The answer to this is the default methods. A default method can be directly added to an interface with an implementation. Yes, you read that right! Interfaces with methods and not just the declaration but definition as well.

public interface ExistingInterface {
public void connect();
public void disconnect();
//Default method.
public default void connectUsingNewProtocol(){
System.out.println("Connection to a new device");
}
}

Some examples in the Java library which use the the default method:

1) stream method in the Collection interface – Enables any collection to be streamed.

    default Stream<E> stream() {
        return ...;
    }

2) reversed method in the Comparator interface – Enables reversing of the comparator

    default Comparator<T> reversed() {
        return Collections.reverseOrder(this);
    }

3) forEach and spliterator in the Iterable interface

One purpose of the default methods was to make changes to the Collection framework without breaking other libraries that use Collection API, like the Apache CollectionUtils or Hibernate and at the same time provide us with new functionality.

We all know that an interface can extend from another interface in Java.  By adding default methods, things get a little complicated and hence there are some things to remember when using default methods:

In the code below, Parent interface has default methods, Child extends from Parent but does not provide implementation.

interface Parent {
default public void methodOne() {
System.out.println("Method one…");
}
default public void methodTwo() {
System.out.println("Method two…");
}
}
interface Child extends Parent{
}
public class ConcreteClass implements Child {
public static void main(String[] args)
{
ConcreteClass concreteClass = new ConcreteClass();
concreteClass.methodOne();
concreteClass.methodTwo();
}
}
}

Output:

Method one…

Method two…

Conclusion : Default methods are inherited in the Child interface.

In the next example below :

Parent interface has default method, Child extends from Parent and does provide or override implementation.

interface Parent
{
default public void methodOne() {
System.out.println("Parent : Method one…");
}
default public void methodTwo() {
System.out.println("Parent : Method two…");
}
}
interface Child extends Parent
{
//overrides methodTwo
default public void methodTwo(){
System.out.println("Child : Method two…");
}
}
public class ConcreteClass implements Child
{
public static void main(String[] args)
{
ConcreteClass concreteClass = new ConcreteClass ();
concreteClass.methodOne();
concreteClass.methodTwo();
}
}

Output:

Parent: Method one…

Child: Method two…

Conclusion:The most specific/ the one at the bottom in the interface hierarchy wins!

What if the ConcreteClass class also provided the implementation for the methodTwo() above ?

public class ConcreteClass implements Child {
public void methodTwo(){
System.out.println("ConcreteClass : Method two…");
}
public static void main(String[] args) {
ConcreteClass concreteClass = new ConcreteClass ();
concreteClass.methodOne();
concreteClass.methodTwo();
}
}

Output:

Parent: Method one…

ConcreteClass: Method two…

Conclusion : Class wins over interface hierarchy!

What happens when we have same default methods in 2 “unrelated” interface and 1 concrete class implementing the 2 interfaces

interface One {
default public void callMe(){
System.out.println("One:callMe…");
}
}
interface Two
{
default public void callMe()
{
System.out.println("Two:callMe…");
}
}
public class ConcreteClass implements One, Two
{
public static void main(String[] args)
{
}
}

Output: The java compiler complains that the method callMe is being inherited from types One and Two. Well, it is our responsibility to resolve the same. This can be done in the following way:

public class ConcreteClass implements One, Two
{
@Override
public void callMe()
{
One.super.callMe();
}
public static void main(String[] args)
{
ConcreteClass concreteClass = new ConcreteClass();
concreteClass.callMe();
}
}

Depending on the implementation of the default method, we can either call the version One or the Two. This is done by using the super keyword. Without using the super keyword, it would mean we are calling the static method on the interface which is not the case here.  At the byte code level , this translates to a invokespecial instruction.

To summarize

  1. Interface hierarchy – the most specific wins
  2. Classes always win in case there is a class that implements a default method and there is an interface hierarchy.
  3. If there is still a problem, it is the responsibility of the developer to resolve it as shown above.

So, does this mean that we do not need abstract classes anymore? Well, that is not right.  What clearly distinguishes the two is state and the fact that a class can inherit only 1 class

So interfaces are always a better idea unless we need state or a skeletal implementation.